Table of contents
Open Table of contents
What is TOTP
TOTP short for Time-Based One-Time Password is a 2 Factor Authentication method used to add an extra layer of security to an online account.
How to use it
To set up TOTP for an online account, users typically receive either a QR code or a secret code from the website where they’re enabling 2FA.
Then they can scan the QR code or manually enter the secret code into an authenticator app like Google Authenticator to link it with the website.
Once linked, the app generates time-based codes, which expire in about 30 seconds.
During subsequent logins, user can retrieve the current code from the app and enter that when prompted for the TOTP code to complete the 2FA process.
How does it work
When the user sets up TOTP, we generate a unique key and store it in the database. This secret code can be displayed either as text or embedded in a QR code.
When the user needs to authenticate, their authenticator app generates a one-time password based on their secret key and the current time.
On the server, when the user attempts to authenticate with this one-time password, the server also calculates the OTP based on the stored secret and the current time. If the OTP generated by the server matches the one entered by the user, the authentication process is successful.
Embedding Secret in QR Code
To embed the necessary information in a QR code for TOTP setup, a specific format is used to ensure compatibility with authenticator apps.
Typically, the QR code contains a URL in the format of:
otpauth://totp/{app_name}:{user_email}?secret={secret_code}&issuer={app_name}&algorithm={algorithm_name}&digits={number_of_digits}&period={number_seconds_to_expire}
Here’s a breakdown of the components:
{app_name}:Represents the name of the application.{user_email}:The user’s email address (or identifier).{secret_code}:The unique secret key generated for the user.{algorithm_name}:Specifies the cryptographic algorithm used (usually HMAC-SHA1).{number_of_digits}:Indicates the length of the generated OTP code (commonly 6 or 8 digits).{number_seconds_to_expire}:Denotes the time interval in seconds for each OTP (typically 30 seconds).
This standardized format ensures interoperability and ease of setup across various authenticator apps.
How to generate TOTP
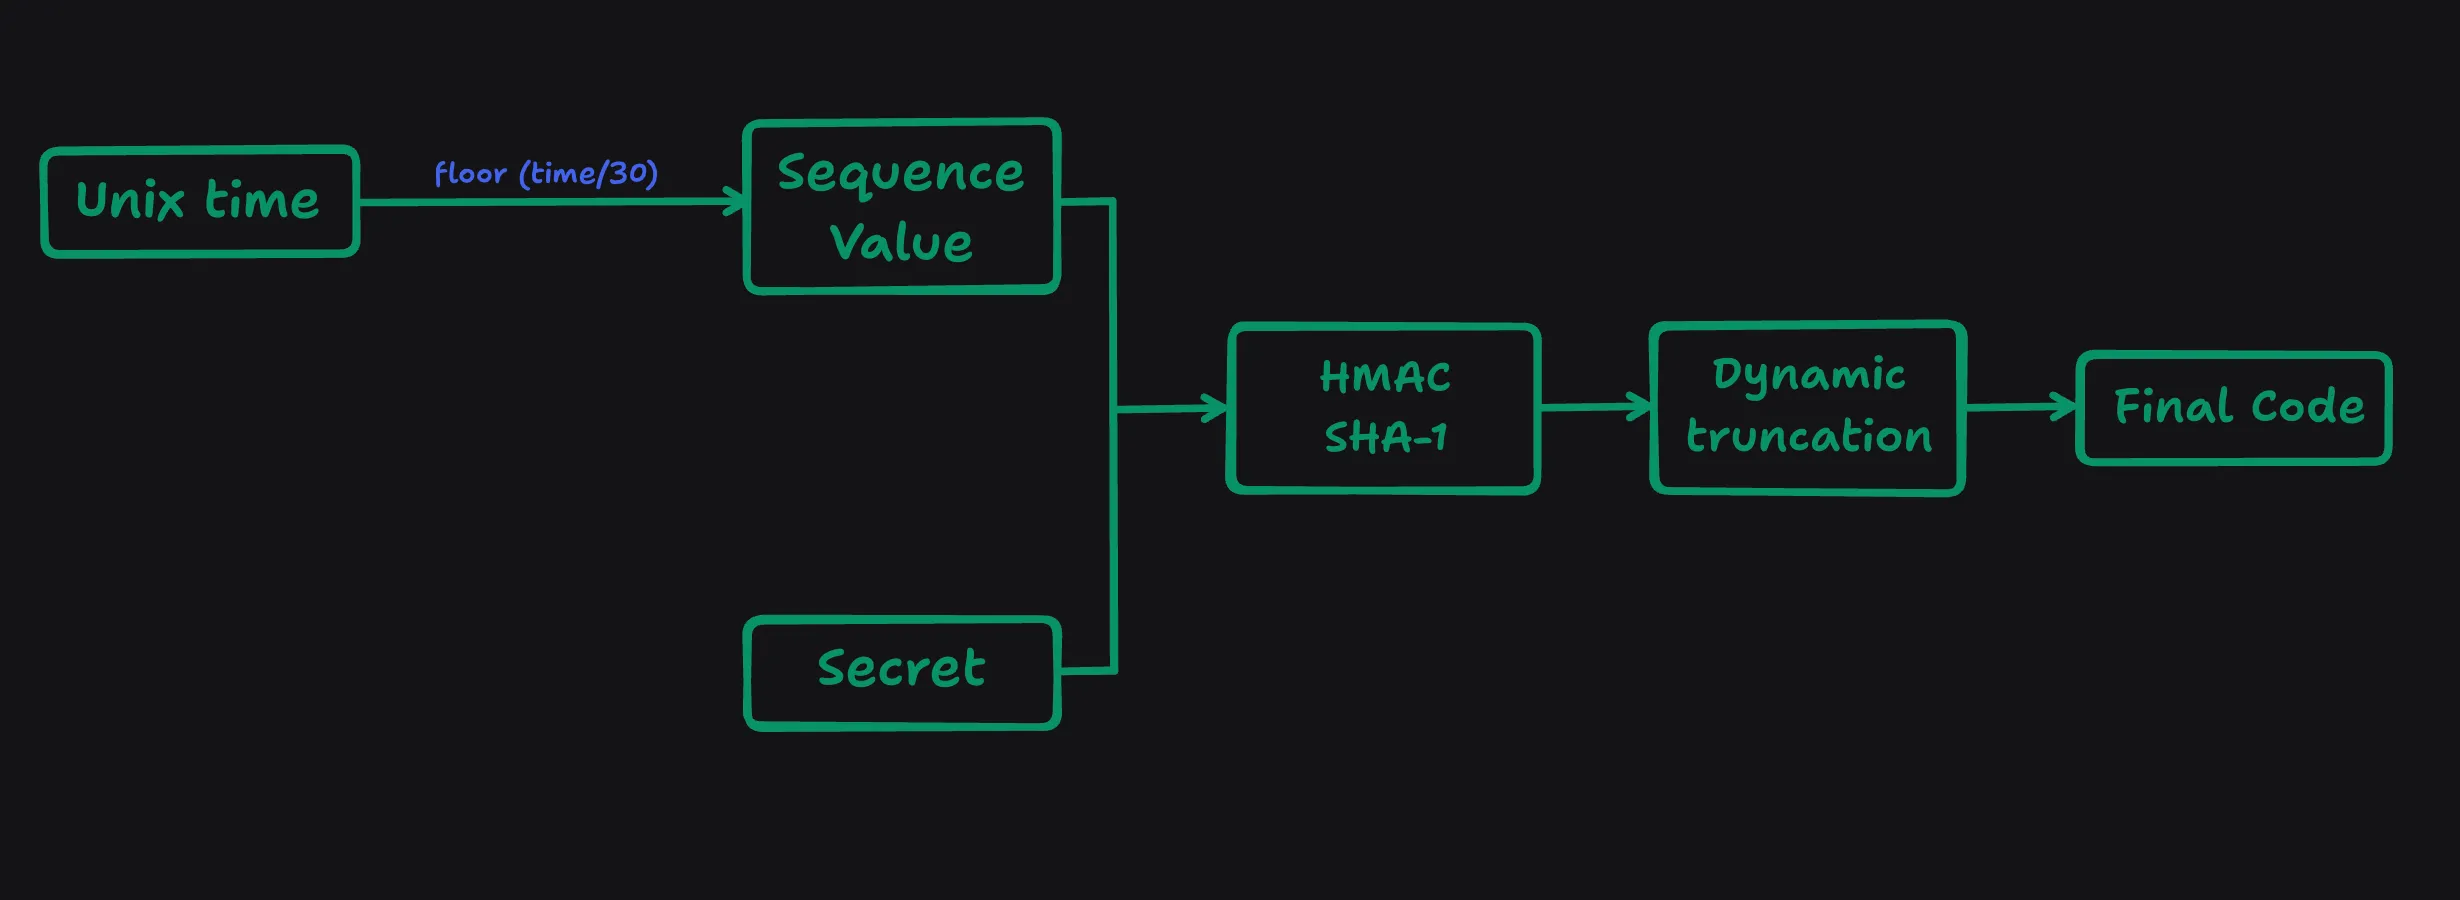
To generate a one-time password (OTP) based on a secret key and the current time, the system follows a precise sequence of steps. First, it obtains the current time in Unix timestamp format. This timestamp is then divided by a predefined interval, typically 30 seconds, resulting in a sequence value. The secret key, unique to each user, is combined with this sequence value. The combination undergoes a cryptographic process known as HMAC-SHA1, which produces a hash value. This hash value undergoes dynamic truncation to extract a certain number of bits, which then form the final OTP

What are the benefit of this
- Adds an extra layer of security beyond just a username and password, reducing the risk of unauthorized access, especially in cases where passwords may have been compromised.
- TOTP doesn’t require an internet connection to generate passwords, making it reliable even in low connectivity environments.
- It’s easy to implement and widely supported by various authentication apps and services, enhancing its usability across different platforms and devices.
- TOTP is based on open standards, promoting interoperability and transparency in its implementation, which contributes to its trustworthiness in the security community.
Example code for TOTP implementation using Laravel
-
Here I’m using the a package called
pragmarx/google2fa-laravelfor TOTP generation, validation etc… -
We’ll also be using the a package called
bacon/bacon-qr-codefor QR Code generation -
for the sake of simplicity, let’s work on a
laravel/uibootstrap starter for demonstrating TOTP implementation in this article -
First scaffold your laravel app by running the following command
composer create-project laravel/laravel totp_app -
Now make the necessary changes (Add your desired DB_CONNECTION, DB credentials, APP_NAME etc..) in your
.envfile and run initial db migrationphp artisan migrate -
Install the
laravel/uipackagecomposer require laravel/ui -
Bootstrap
laravel/uiauth starterphp artisan ui bootstrap --auth -
install packages for TOTP
composer require pragmarx/google2fa-laravelcomposer require bacon/bacon-qr-codephp artisan vendor:publish --provider="PragmaRX\Google2FALaravel\ServiceProvider" -
Add the following middleware in
bootstrap/app.phpif you are on laravel 11.x->withMiddleware(function (Middleware $middleware) { $middleware->alias([ '2fa' => Google2FAMiddleware::class ]); })If you are on laravel 10.x or lower, add the following middleware in app/Http/Kernel.php
protected $routeMiddleware = [ ... '2fa' => \PragmaRX\Google2FALaravel\Middleware::class, ]; -
Now create a migration for adding 2FA secret to user table
php artisan make:migration add_google_2fa_columns -
Add the following up and down functions in the newly created migrations.
public function up(): void
{
    Schema::table('users', function (Blueprint $table) {
        $table->string('google2fa_secret')->nullable();
    });
}

public function down(): void
{
    Schema::table('users', function (Blueprint $table) {
        $table->dropColumn('google2fa_secret');
    });
}
Now run the migration
php artisan migrate -
Update the
app/Models/User.phpmodel (make the necessary changes from below)use Illuminate\Database\Eloquent\Casts\Attribute; // <- Added this protected $fillable = [ 'name', 'email', 'password', 'google2fa_secret' // <- Added this ]; // Add the following function /** * Get the Google 2FA secret attribute. * * This method returns an Attribute object that handles the encryption and decryption of the Google 2FA secret. * The 'get' property of the Attribute object is a closure that decrypts the value. * The 'set' property of the Attribute object is a closure that encrypts the value. * * @return Attribute The Attribute object with 'get' and 'set' properties for handling the Google 2FA secret. */ protected function google2faSecret(): Attribute { return new Attribute( get: fn ($value) => decrypt($value), set: fn ($value) => encrypt($value) ); } -
Now in your
routes/web.phpadd the following middleware and routesuse App\Http\Controllers\Auth\RegisterController; use App\Http\Controllers\HomeController; use Illuminate\Support\Facades\Auth; Route::middleware(['2fa'])->group(function () { Route::get('/home', [HomeController::class, 'index'])->name('home'); Route::post('/2fa', function () { return redirect(route('home')); })->name('2fa'); }); Route::get('/complete-registration', [RegisterController::class, 'completeRegistration'])->name('complete.registration'); -
Make the following changes in your
app/Http/Controllers/Auth/RegisterController.phpuse Illuminate\Http\Request; use RegistersUsers { register as registration; // <- update RegisterUsers trait like this } protected function create(array $data) { return User::create([ 'name' => $data['name'], 'email' => $data['email'], 'password' => Hash::make($data['password']), 'google2fa_secret' => $data['google2fa_secret'], // <- Add this ]); } /** * Handle a registration request for the application. * * This method validates the request data, generates a Google 2FA secret key for the user, * stores the registration data in the session, generates a QR code image for Google 2FA, * and returns a view with the QR code image and the secret key. * * @param \Illuminate\Http\Request $request * @return \Illuminate\Http\Response */ public function register(Request $request) { $this->validator($request->all())->validate(); $google2fa = app('pragmarx.google2fa'); $registration_data = $request->all(); $registration_data['google2fa_secret'] = $google2fa->generateSecretKey(); $request->session()->put('registration_data', $registration_data); $QR_Image = $google2fa->getQRCodeInline( config('app.name'), $registration_data['email'], $registration_data['google2fa_secret'] ); return view('google2fa.register', [ 'QR_Image' => $QR_Image, 'secret' => $registration_data['google2fa_secret'], ]); } /** * Complete the registration process for the application. * * This method merges the registration data stored in the session with the current request data, * and then calls the `registration` method to handle the actual registration process. * * @param \Illuminate\Http\Request $request * @return \Illuminate\Http\Response */ public function completeRegistration(Request $request) { $request->merge(session('registration_data')); return $this->registration($request); } -
Now add the following views and your all good to go
resources/views/google2fa/index.blade.php
@extends('layouts.app')

@section('content')
<div class="container">
    <div class="row justify-content-center align-items-center" style="height: 70vh;">
        <div class="col-md-8 col-md-offset-2">
            <div class="panel panel-default">
                <div class="panel-heading font-weight-bold">
                    Register
                </div>
                <hr />
                @if ($errors->any())
                    <div class="col-md-12">
                        <div class="alert alert-danger">
                            <strong>{{ $errors->first() }}</strong>
                        </div>
                    </div>
                @endif

                <div class="panel-body">
                    <form method="POST" action="{{ route('2fa') }}" class="form-horizontal">
                        {{ csrf_field() }}

                        <div class="form-group">
                            <p>
                                Please enter the <strong>OTP</strong> generated on your Authenticator App. <br />
                                Ensure you submit the current one because it refreshes every 30 seconds.
                            </p>
                            <label for="one_time_password" class="col-md-4 control-label">
                                One Time Password
                            </label>
                            <div class="col-md-6">
                                <input
                                    id="one_time_password"
                                    type="number"
                                    class="form-control"
                                    name="one_time_password"
                                    required
                                    autofocus
                                />
                            </div>
                        </div>

                        <div class="form-group">
                            <div class="col-md-6 col-md-offset-4 mt-3">
                                <button type="submit" class="btn btn-primary">
                                    Login
                                </button>
                            </div>
                        </div>
                    </form>
                </div>
            </div>
        </div>
    </div>
</div>
@endsection
resources/views/google2fa/register.blade.php
@extends('layouts.app')

@section('content')
<div class="container">
    <div class="row justify-content-center align-items-center" style="height: 70vh;">
        <div class="col-md-8 col-md-offset-2">
            <div class="panel panel-default">
                <div class="panel-heading font-weight-bold">
                    Register
                </div>
                <hr />
                @if ($errors->any())
                    <div class="col-md-12">
                        <div class="alert alert-danger">
                            <strong>{{ $errors->first() }}</strong>
                        </div>
                    </div>
                @endif

                <div class="panel-body">
                    <form method="POST" action="{{ route('2fa') }}" class="form-horizontal">
                        {{ csrf_field() }}

                        <div class="form-group">
                            <p>
                                Please enter the <strong>OTP</strong> generated on your Authenticator App. <br />
                                Ensure you submit the current one because it refreshes every 30 seconds.
                            </p>
                            <label for="one_time_password" class="col-md-4 control-label">
                                One Time Password
                            </label>
                            <div class="col-md-6">
                                <input
                                    id="one_time_password"
                                    type="number"
                                    class="form-control"
                                    name="one_time_password"
                                    required
                                    autofocus
                                />
                            </div>
                        </div>

                        <div class="form-group">
                            <div class="col-md-6 col-md-offset-4 mt-3">
                                <button type="submit" class="btn btn-primary">
                                    Login
                                </button>
                            </div>
                        </div>
                    </form>
                </div>
            </div>
        </div>
    </div>
</div>
@endsection
resources/views/google2fa/register.blade.php
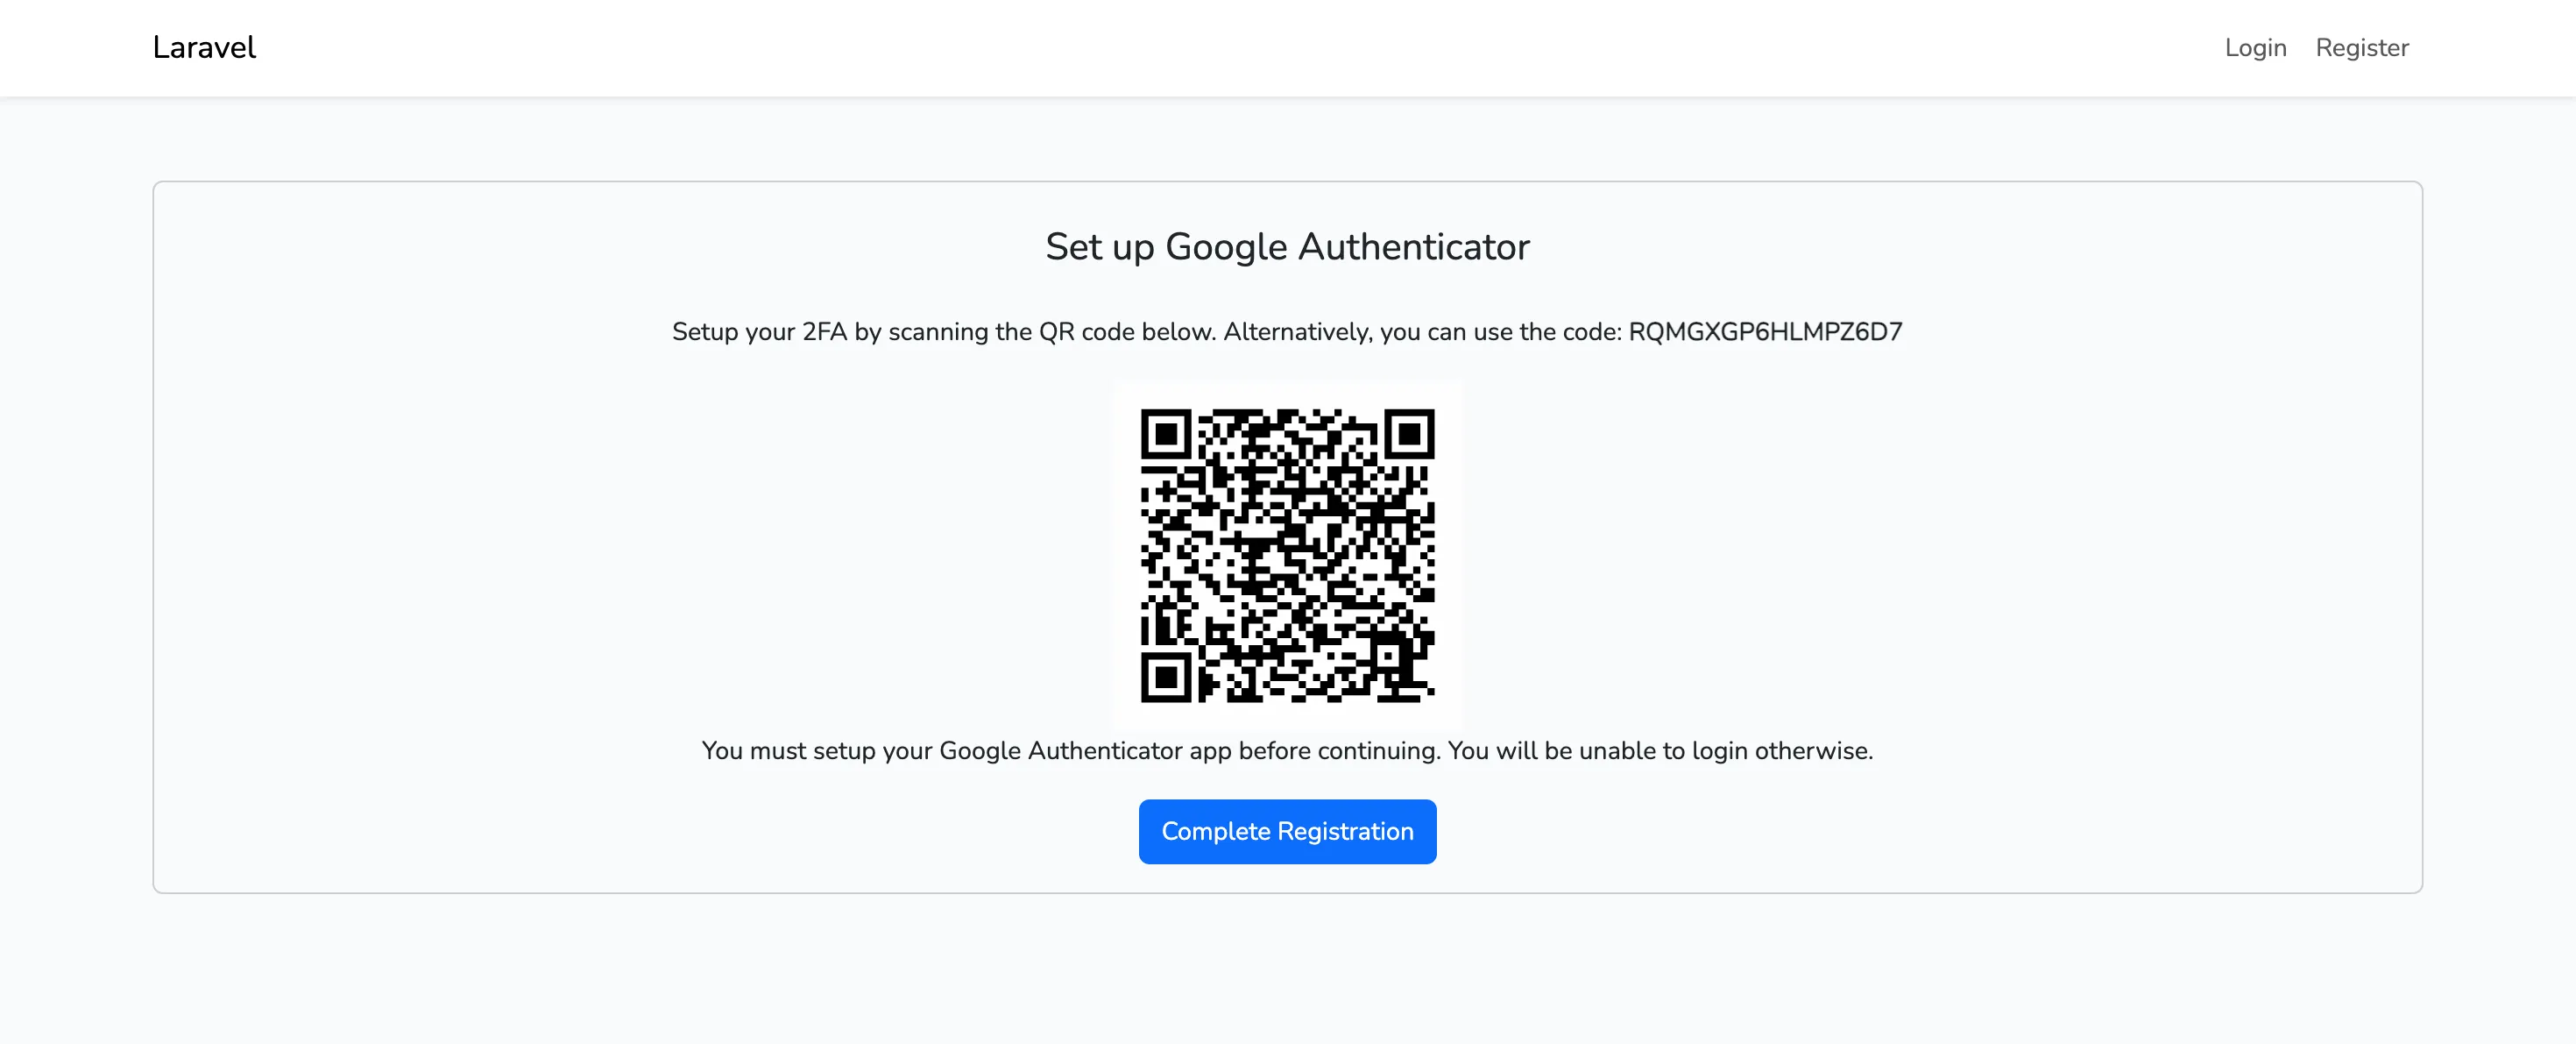
@extends('layouts.app') @section('content') <div class="container"> <div class="row"> <div class="col-md-12 mt-4"> <div class="card card-default"> <h4 class="card-heading text-center mt-4"> Set up Google Authenticator </h4> <div class="card-body" style="text-align: center;"> <p> Setup your 2FA by scanning the QR code below. Alternatively, you can use the code: <strong>{{ $secret }}</strong> </p> <div> {!! $QR_Image !!} </div> <p> You must setup your Google Authenticator app before continuing. You will be unable to login otherwise. </p> <div> <a href="{{ route('complete.registration') }}" class="btn btn-primary"> Complete Registration </a> </div> </div> </div> </div> </div> </div> @endsection -
Now when you sign up to the app, after the registration form you’ll get the following page to setup your TOTP in Google Authenticator App

-
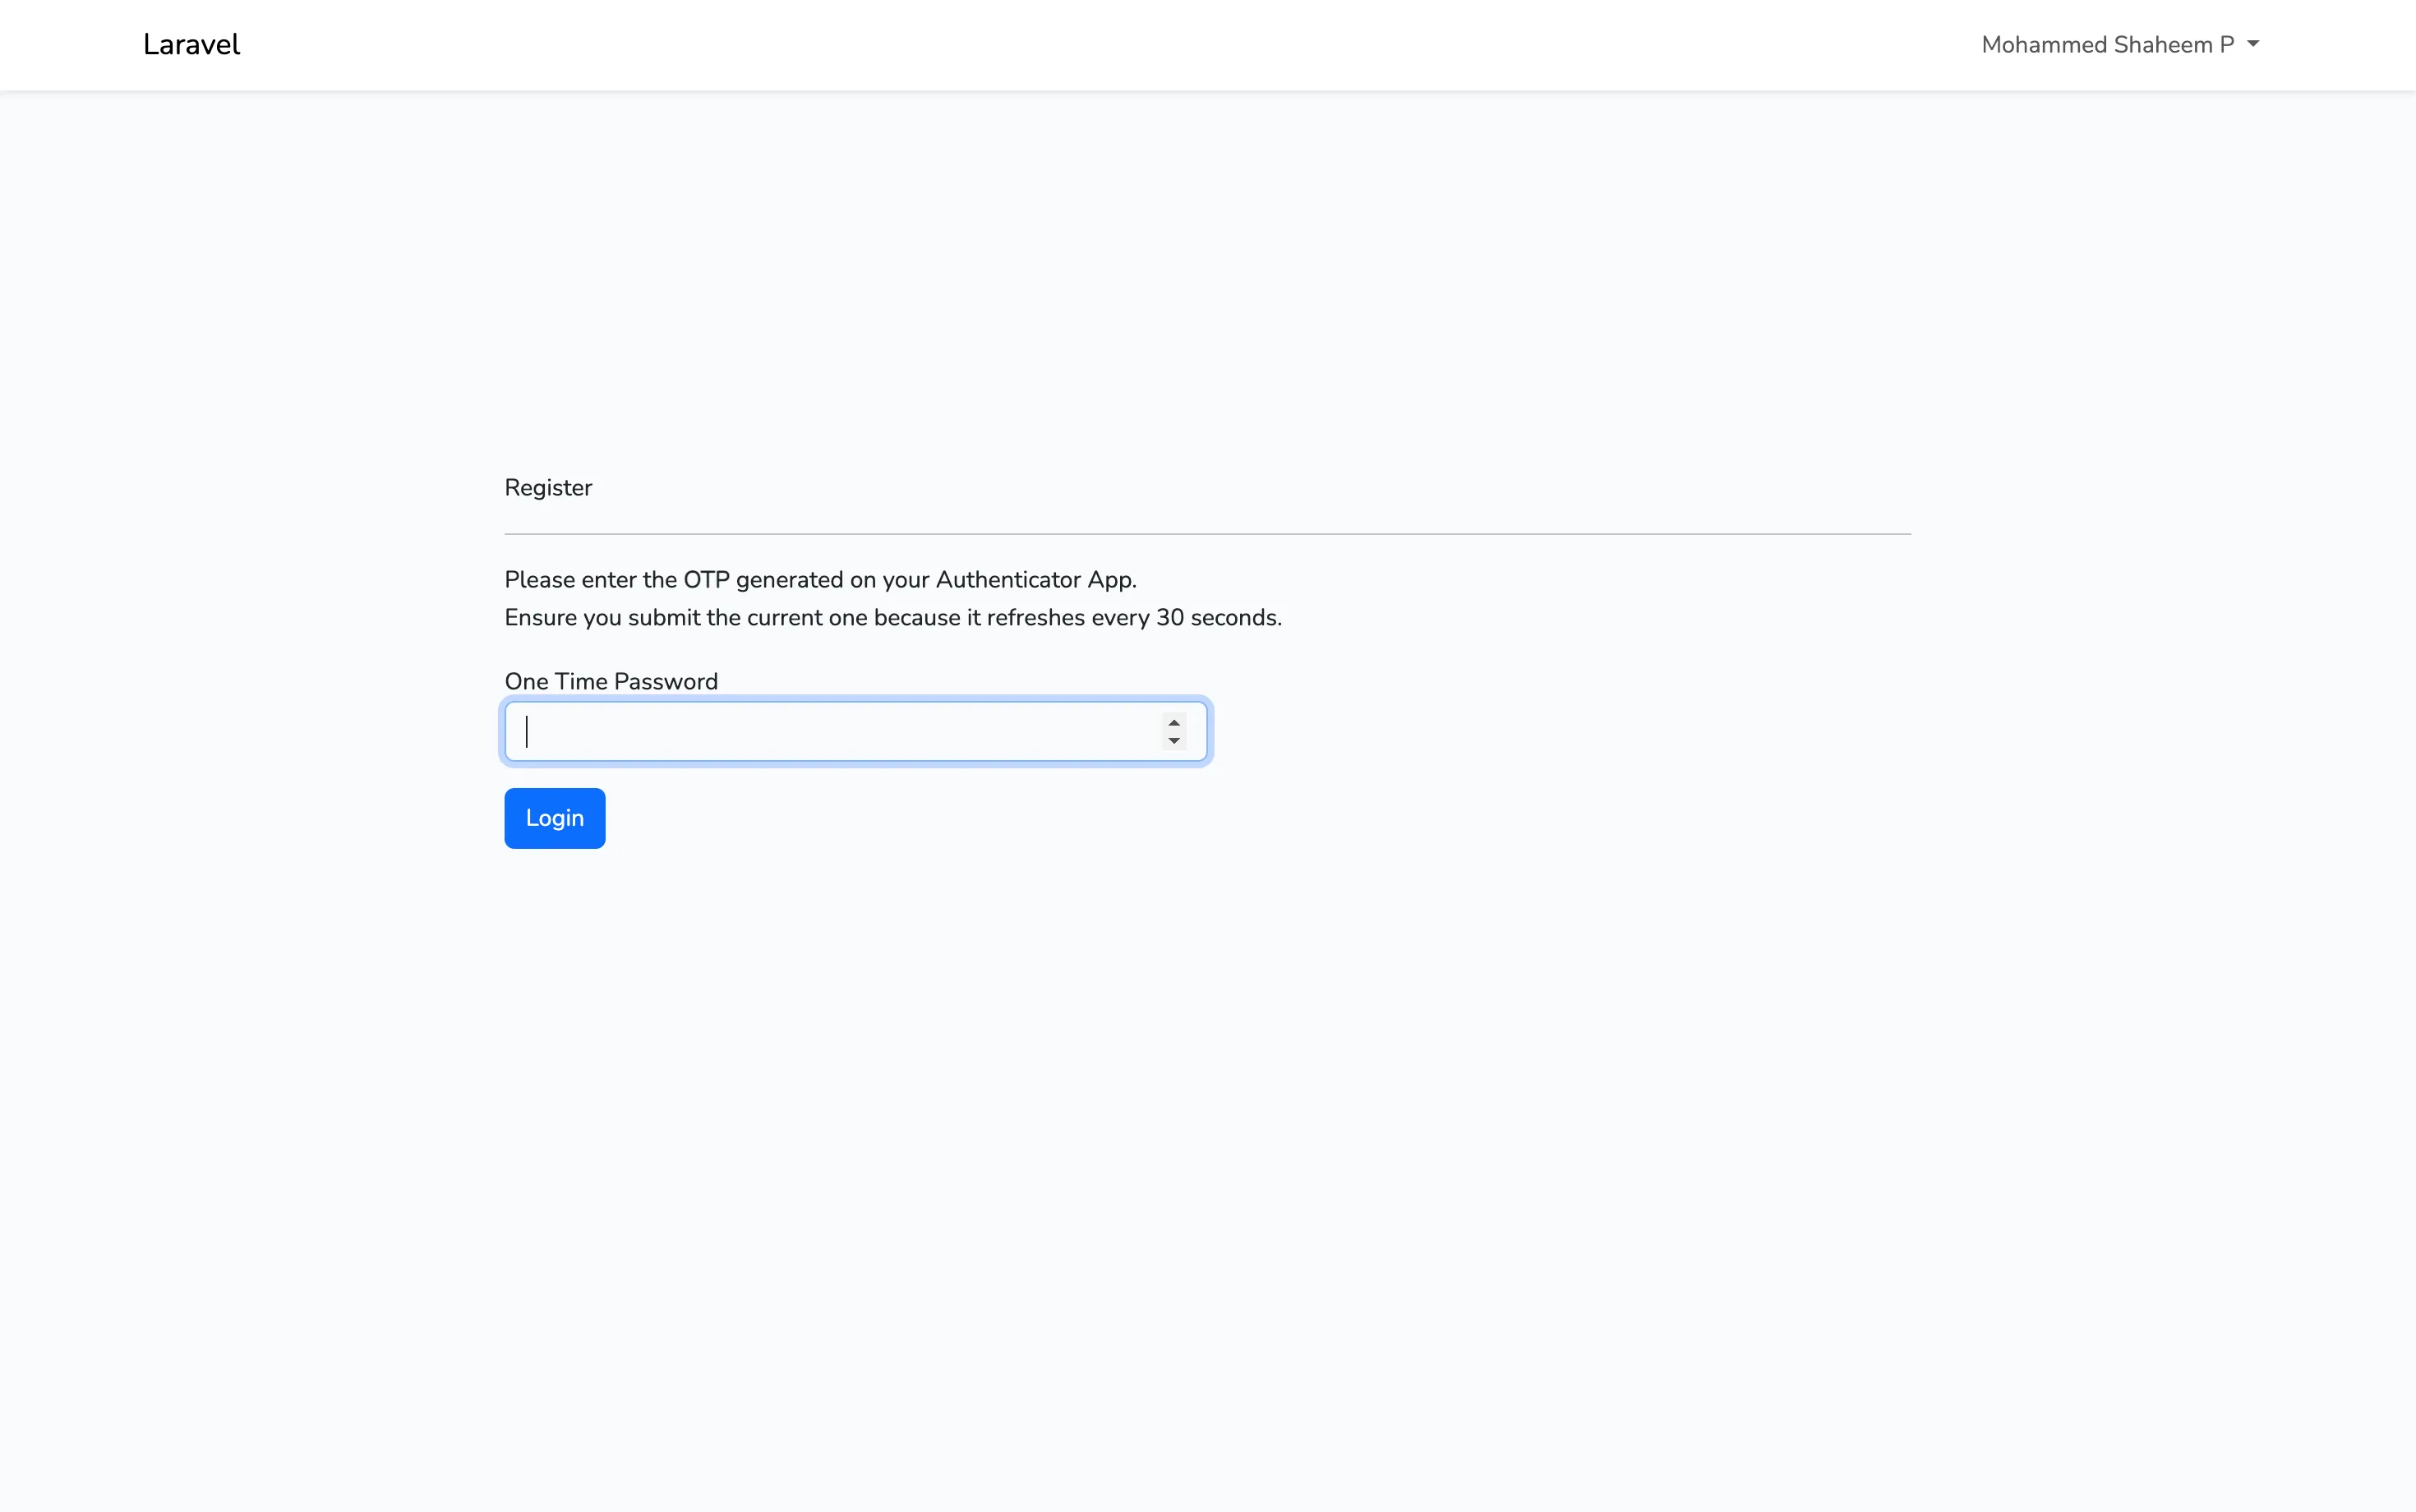
Also in your subsequent logins, you’ll get the following form asking to enter the TOTP in-order to successfully login

